
- home
- BAKERECIPES
BakeRecipes
Bringing real baking into your home with deliciously simple recipes.

Prep 30min (+2hr chilling and decorating time)Bake 20-25minMakes about 25 cookies
Use this recipe as the base for cookies decorated with either royal icing (like these gorgeous Iced Heart Cookies) or fondant. The sweetness of the icing complements the spicy gingerbread base perfectly and lays down a canvas for you to create something extra special for customers, friends and family.
Ingredients
125g salted butter, softened
90g (½ cup, lightly packed) brown sugar
235g (160ml/⅔ cup) golden syrup
1 teaspoon natural vanilla extract or essence
375g (2½ cups) plain flour
2 teaspoons ground ginger
1 teaspoon ground cinnamon
1 teaspoon bicarbonate of soda
Method
- Use an electric mixer with a paddle beater attachment to beat the butter and sugar on medium speed for 2-3 minutes, or until pale and creamy. Add the golden syrup and vanilla and beat to combine evenly. Sift together the flour, ginger, cinnamon and bicarbonate of soda. Add to the butter mixture and beat on low speed until just combined evenly and a soft dough forms. Turn the dough onto a lightly floured surface and divide into 2 equal portions. Shape each portion into a disc about 2cm thick, wrap in plastic wrap and place in the fridge for 2 hours or until firm enough to roll easily.
- Preheat the oven to 160°C (140°C fan-forced). Line two large oven trays with baking paper.
- Use a lightly floured rolling pin to roll out one portion of the dough (leave the remaining portion in the fridge) on a lightly floured benchtop to 6mm thick. Use cutter/s of your choice, approximately 7.5cm across at the widest part, to cut out shapes and then use a palette knife to carefully transfer the shapes to the prepared oven trays, leaving a little room between each for
spreading. Reroll any dough scraps to make more shapes. Discard any offcuts from the second rolling. Repeat with the remaining gingerbread dough portion. - Bake in preheated oven for 20-25 minutes, swapping the trays halfway through baking, or until the cookies are just starting to colour and are cooked through. Stand the cookies on the trays for a few minutes before transferring to a wire rack to cool completely. Decorate as desired.
Baker's Tips
- Undecorated biscuits will keep in an airtight container at room temperature for up to 5 days.

Prep 1-2hr (+drying time)Makes about 25 biscuits
If you're keen to show your loved one/s just how much they mean to you by baking them something irresistibly sweet, then you really can't go past a batch of these gorgeous cookies! The style of decorating used to create them is called 'flood on flood' icing and is a really effective way to decorate gingerbread or sugar biscuits. The key is to be patient, try not to rush and remember your designs will improve with practice. You will need at least three small piping bags and three Wilton or Loyal #4 round piping nozzles for this style. This Royal Icing recipe makes about 3 cups of icing and is enough to decorate about 25 average-sized cookies.
Ingredients
Gel food colours of your choice (we have used shades of 'rose pink' and 'raspberry'), to tint
About 25 gingerbread cookies
Edible sprinkles, to decorate
Royal Icing
3 egg whites (from 59g eggs) or 90g pasteurized egg whites (see Baker’s Tips)
675g (1½ cups) pure icing sugar, sifted through a fine sifter
½-3 teaspoons strained fresh lemon juice
Room temperature water, to thin icing
Method
- To make the Royal Icing, place the egg whites then the icing sugar in the bowl of an electric mixer. Use the paddle beater to beat on low speed until combined. Increase speed to medium and beat for 5 minutes. The icing will be smooth and thick at this stage. Add the lemon juice, ¼ teaspoon at a time, beating well between each addition, until the icing reaches a good piping consistency. The icing should be the consistency of toothpaste - soft but will hold its shape and form a soft peak when the beater is lifted.
- Immediately cover the bowl with plastic wrap and then a damp tea towel or cloth to prevent it from drying out (see Baker’s Tips).
- Divide the icing evenly between 3-5 small bowls (depending on how many different coloured icings you would like to use - we used 4 for these cookies including the white) and cover each bowl well. Transfer one white icing portion to a small piping bag fitted with a Wilton or Loyal #4 round piping tip (this will be used to pipe the outlines). Working with one portion of the remaining icing at a time, tint to desired colours, then add a little water, a drop at a time, and use a small palette knife or metal spoon to stir until it reaches the right consistency for ‘flooding’ (see Baker’s Tips). As soon as each portion reaches the right consistency, spoon into a small piping bag fitted with a Wilton or Loyal #4 round piping tip. Twist the end of the piping bag and seal with a clip or elastic band (this will help prevent it from drying out). Cover the tip with plastic wrap and then a damp cloth or tea towel and set aside while tinting and thinning the remaining icing portions.
- Use the white icing to pipe an outline around the inside edge of a cookie to create a border so that the icing in the centre won’t flow over the edge. Set aside for 3-5 minutes or until firm but not set.
- Pipe a tinted icing into the centre of a cookie to 'flood' it (making sure there will be enough to cover it comfortably but not too much so that the icing flows over the piped border). Use a toothpick to carefully spread the icing to cover fully, if needed, and then let the icing settle and become smooth. To achieve a ‘flood on flood’ effect (so that the pattern sinks into the base icing), while the icing is still wet, use contrasting tinted icing/s to pipe the stripes, dots or patterns onto the flooded icing (see Baker’s Tips). We created the heart pattern by piping dots and then dragging a toothpick through the dot from top to bottom and a little beyond. Sprinkle with edible sprinkles to decorate, if desired.
- Set iced cookies aside to dry completely overnight before storing (see Baker’s Tips).
Baker's Tips
- If you are concerned that these cookies will be served to pregnant women or people with compromised immune systems, use pasteurised egg whites. They are available in a carton from the refrigerated section of the supermarket.
- Royal Icing will dry out and start to set very quickly if not covered well. Cover bowls and the tips of filled icing bags with plastic wrap and then a damp tea towel while you are not using them to prevent the icing from drying out.
- To test if the icing is at the right consistency for ‘flooding’, drop a teaspoonful of the icing back into the bowl. If it melts back into the icing and the surface becomes flat in 5-6 seconds it is ready. If not, add a little more water to thin or a little more icing sugar to thicken it.
- If using the ‘flood on flood’ technique, to prevent the icing from spilling over the piped border, it is important not to over-flood the centre of the cookie with icing.
- It is best to have all the tinted icing consistencies the same for the best results for the 'flood on flood' technique. However, if two icing portions are slightly different consistencies, use the thinner one first to cover the cookie first and then use the slightly thicker one on top to create the decoration.
- If your royal icing becomes too thick during decorating, remove it from the piping bag and stir in a drop or two of water or enough to reach the desired consistency. A dropper is ideal for adding this small amount of water.
- The time it will take for the icing to dry/set will depend greatly on the weather (temperature and humidity). If humid, to assist in the drying, place the cookies on a lined tray in an oven preheated to 50°C for 30-60 minutes. Also if it is really humid, it is best to put the cookies straight into an airtight container lined with absorbent paper as soon as they cool from drying in the oven.
- These decorated cookies will keep in a single layer in a sealed airtight container lined with paper towel for up to 5 days.
- The Royal Icing will keep in a well-sealed container in the fridge for up to 3 days. Bring to room temperature to use. You may need to add a little more water to bring it to the correct consistency.

Prep 15min (+30min cooling time)Bake 40minMakes 7 cups
There really is nothing like a homemade cereal. One word of advice though – don’t leave the cardamom out as it gives this granola an elusive and fascinating flavour.
Ingredients
285g (3 cups) rolled oats
150g natural almonds, coarsely chopped
55g (¾ cup) shredded coconut
40g (¼ cup) sunflower seeds
40g (¼ cup) pepitas (pumpkin seeds)
2 teaspoons ground cinnamon
½ teaspoon ground cardamom
185ml (¾ cup) maple syrup
2 tablespoons sunflower oil
2 teaspoons vanilla essence
170g (1 cup) seedless raisins
80g (½ cup) dried apricots, shredded
Method
- Preheat oven to 160°C (140°C fan-forced).
- Line a large baking tray with non-stick baking paper.
- Combine the oats, almonds, coconut, sunflower seeds, pepitas, cinnamon and cardamom in a large heatproof bowl.
- Combine the maple syrup, sunflower oil and vanilla. Add to the oat mixture and use a wooden spoon to mix until evenly combined. Spread over the lined tray and bake in preheated oven for 30 minutes, stirring twice during baking. Stir through the raisins and apricots and bake for a further 10 minutes or until the oats are deep golden and well toasted.
- Cool on the tray (this will take about 30 minutes). Serve with milk, yoghurt and/or fruit.
Baker's Tips
- Store this granola in an airtight container in a cool dark spot for up to 1 month.
This recipe is from Anneka's SBS Food online column, Bakeproof: Gifts from the Kitchen. CLICK HERE for more Bakeproof recipes.
Photography by Alan Benson.
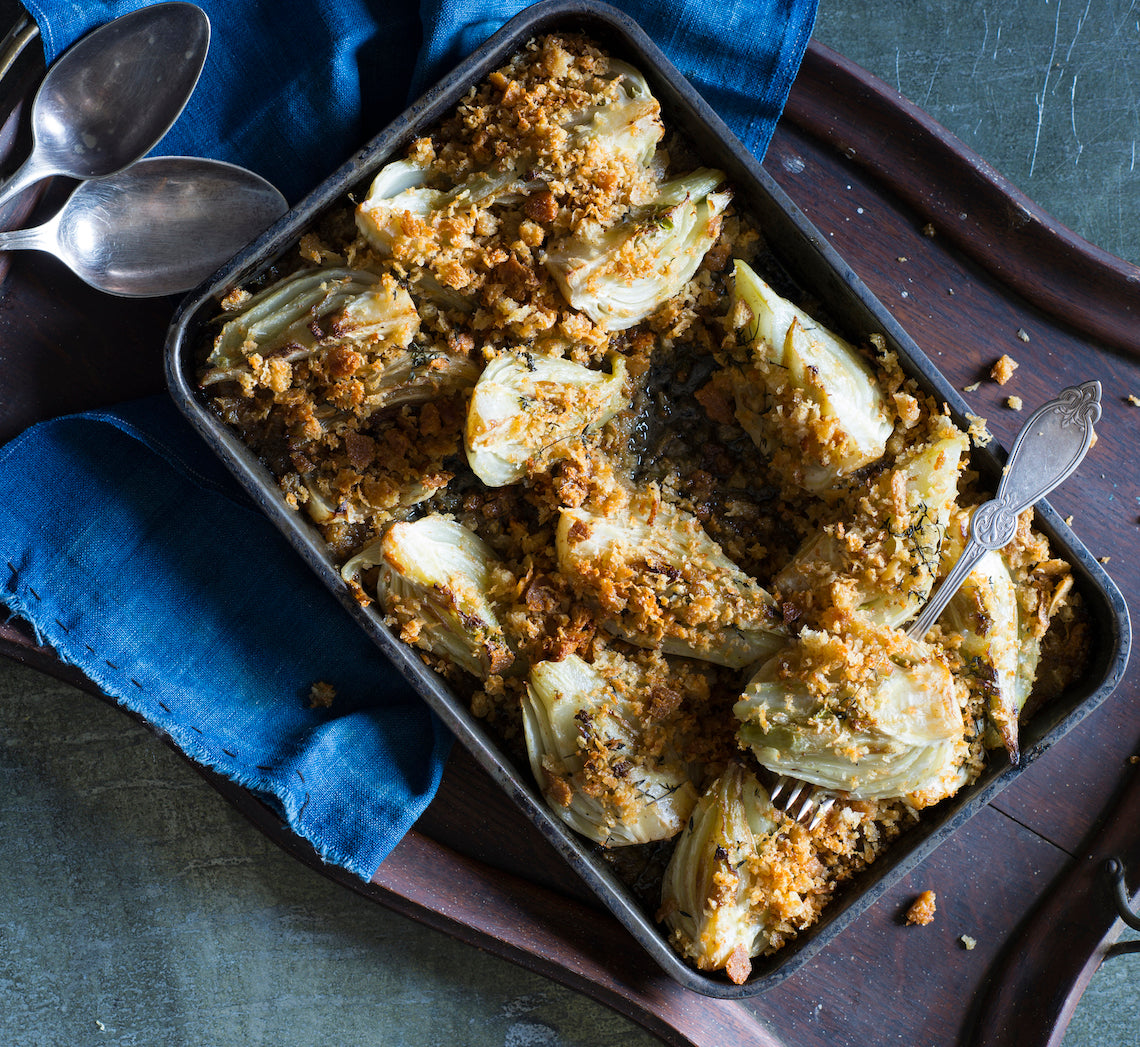
Prep 25minBake 45minMakes 4-6 serves
If you’re not a big fan of fennel then you may just have to reconsider your standing once you have tried this dish. Baked fennel – particularly when teamed with the saltiness of anchovies, the crunch of crisp breadcrumbs and the savouriness of fresh thyme – is one of the best side dishes winter has to offer.
Ingredients
- 2 tablespoons olive oil
5 anchovy fillets, chopped
60g butter
100g coarse sourdough breadcrumbs
2 tablespoons chopped flat-leaf parsley
4 baby fennel bulbs, trimmed, cut into quarters
12 thyme sprigs, leaves picked
250ml (1 cup) good-quality chicken stock
Method
- Preheat the oven to 190°C (180°C fan-forced).
- Heat 1 tablespoon olive oil in a large frying pan over medium heat. Add the anchovies and cook, stirring occasionally, for 2-3 minutes or until the anchovies dissolve. Add 30g of the butter and the breadcrumbs and toss until the breadcrumbs are lightly toasted. Transfer to a bowl, toss through the parsley and set aside.
- Add the remaining oil and butter to the frying pan and heat over medium-high heat until the butter is foaming. Add the fennel in a single layer and cook for 3 minutes each side or until golden and starting to soften.
- Transfer the fennel, in a single layer, to a 2 litre (8 cup) capacity dish, and pour any pan juices over the top. Scatter with the thyme leaves and pour the chicken stock over. Cover with foil and bake for 15 minutes. Remove the foil, sprinkle with the breadcrumbs and bake for a further 20-25 minutes or until the fennel is tender when pierced with a skewer and the breadcrumbs are golden and crisp.
- Serve immediately.
Baker's Tips
- This dish is best eaten straight from the oven, while the fennel is warm and the bread chunks still crisp, however it will keep in an airtight container in the fridge for up to 3 days. Serve at room temperature or reheat at 180°C (160°C fan-forced) for 10 minutes or until heated through.
This recipe is from Anneka's SBS Food online column, Bakeproof: Winter Root Vegetables. CLICK HERE for more Bakeproof recipes.
Photography by Alan Benson.
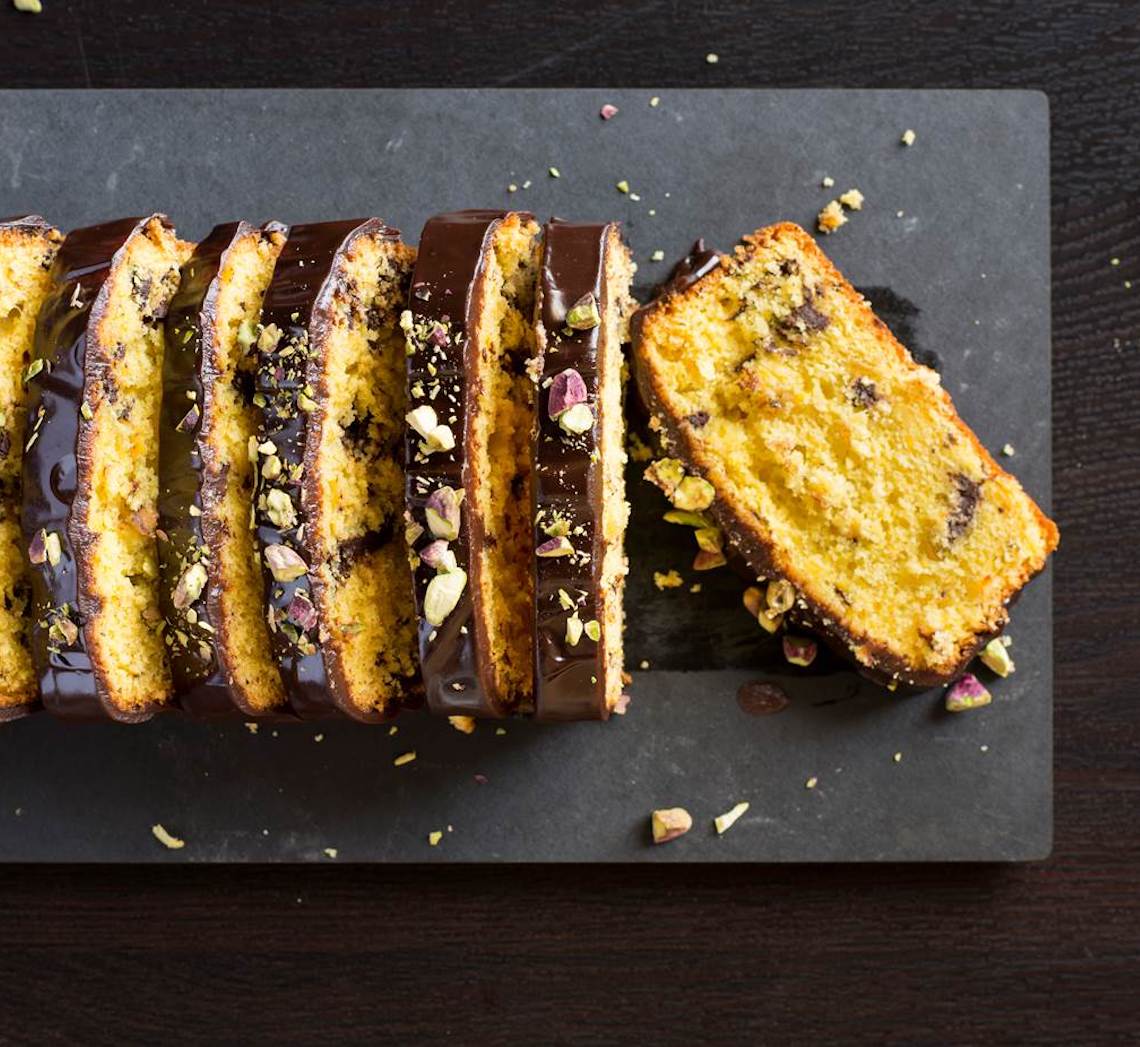
Prep 25min (+ 1hr chilling, 2hr cooling and 30min standing time)Bake 1hrMakes 10 serves
Choc-orange, or jaffa, is such a great flavour. This dead-easy cake is made completely in the food processor using a whole orange, rind and all (no that isn’t a mistake!). Orange flower water is optional in this recipe but will give the cake a slightly more ‘refined’ orange character.
Ingredients
1 orange, quartered, core and seeds removed
220g (1 cup) caster sugar
125g butter, melted and cooled
2 eggs, at room temperature
1 tabsepoon orange flower water, or to taste (optional)
185g (1¼ cups) self-raising flour
35g (¼ cup) plain flour
100g good-quality dark chocolate (54% cocoa), chopped
35g (¼ cup) coarsely chopped toasted pistachios, to sprinkle
Chocolate glaze
150g good-quality dark chocolate (54% cocoa), chopped
125ml (½ cup) pouring cream
Method
- Preheat oven to 170ºC (150ºC fan-forced). Grease 11cm x 21cm (base measurement) loaf tin with melted butter and line the base and two long sides with non-stick baking paper.
- Place the whole orange, sugar, butter, eggs and orange flower water in the bowl of a food processor. Process until the orange is finely chopped. Add the self-raising and plain flours and process until just combined. Transfer the mixture to a bowl and use a large metal spoon or spatula to fold in the chocolate.
- Pour the mixture into the prepared tin and use the back of a spoon to smooth the surface. Bake in preheated oven for 60 minutes or until a skewer inserted into the centre comes out clean. Remove from the oven and set aside for 5 minutes before transferring onto a wire rack to cool (this will take about 2 hours). Place the cake, still on the wire rack in the fridge for 1 hour to chill (this will help the glaze set).
- Meanwhile, to make the chocolate glaze, place the chocolate in a heatproof bowl. Heat the cream in a small saucepan over medium heat until almost simmering. Pour over the chocolate and stand for 1 minute. Stir until melted and smooth. Set aside to until cooled to room temperature. Pour the glaze over the cake on the wire rack, allowing it to drizzle down the sides. Sprinkle with the pistachios and set aside for 30 minutes or until the glaze sets. Serve in slices.
Baker's Tips
- This cake will keep in an airtight container at room temperature for up to 3 days.
This recipe is from Anneka's SBS Food online column, Bakeproof: Easy Chocolate Cakes. CLICK HERE for more Bakeproof recipes.
Photography by Alan Benson.
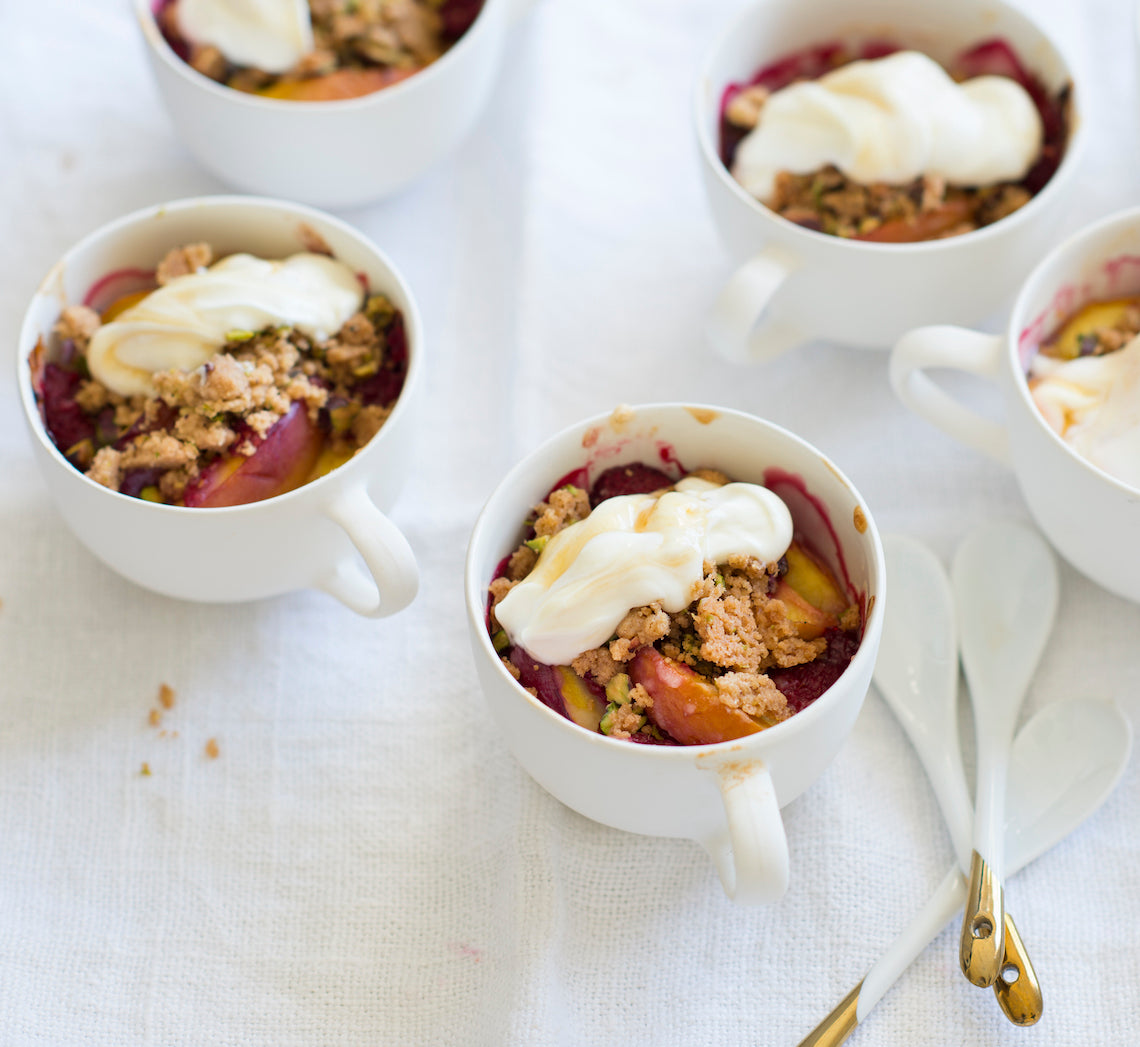
Prep 25minBake 40minMakes 6 serves
We often think of crisps and crumbles as winter desserts, but please don’t pigeon-hole them! This combination of sweet nectarines and tart raspberries, subtly flavoured with rosewater, topped with a pistachio 'crisp' topping and served with honey-flavoured yoghurt is a sublime summer dessert. Any leftovers are good for breakfast!
Ingredients
750g white or yellow nectarines
300g fresh or frozen raspberries or blueberries
55g (¼ cup) caster sugar
3 teaspoons rosewater, or to taste
1½ tablespoons plain flour
Pistachio topping
75g (½ cup) plain flour
55g (¼ cup) caster sugar
1 teaspoon ground cinnamon
80g chilled butter, diced
50g pistachio kernels, chopped, toasted
Honey yoghurt
200g tub Greek-style yoghurt
1 tablespoon pure honey, or to taste
Method
- Preheat oven to 190°C (170°C fan-forced).
- To make the Pistachio topping, combine the flour, sugar and cinnamon in a medium bowl. Use your fingertips to rub in the butter until the mixture begins to resemble coarse breadcrumbs. Stir in the pistachios.
- Halve the nectarines and remove the stones. Cut each half into 4 wedges. Combine with the sugar, rosewater and flour and toss to combine. Add the raspberries and toss gently to combine evenly. Divide the fruit mixture evenly among 6 x 250 ml (1 cup) ramekins or ovenproof dishes. Sprinkle the pistachio crisp topping over the fruit to cover.
- Bake in preheated oven for 35-40 minutes or until the fruit is tender when pierced with a skewer and the topping is crisp and golden.
- Meanwhile, to make the Honey yoghurt, stir the yoghurt and honey in a medium bowl until combined. Cover and refrigerate until required.
- Serve the crisp warm or at room temperature with the honey yoghurt.
Baker's Tips
- You can also bake this crisp in a 1.5 litre (6 cup) ovenproof dish. Bake for 50 minutes.
This recipe is from Anneka's SBS Food online column, Bakeproof: Stone Fruit.
CLICK HERE for more Bakeproof recipes.
Photography by Alan Benson.
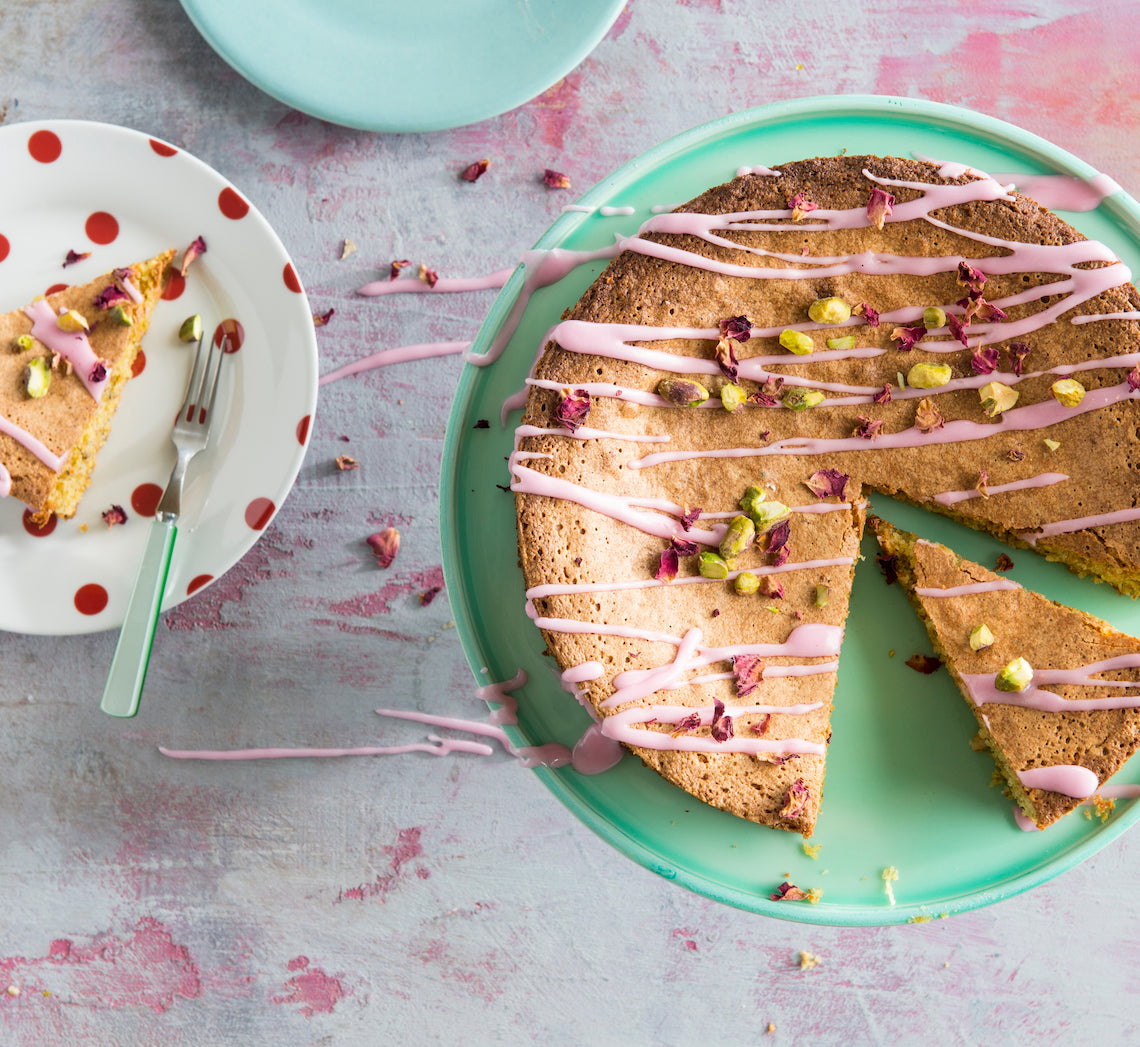
Prep 30min (+1hr cooling time)Bake 30minMakes 8-10 serves
This gluten-free and dairy-free recipe, with its subtle lemon flavour teamed with an aromatic rosewater icing and light nutty texture, is the perfect afternoon-tea cake. It will dip slightly in the centre due to its delicate nature but this is just a sign of how lovely and light it is.
Ingredients
Light olive oil, to grease
100g (1 cup) almond meal
100g (¾ cup) raw unsalted pistachios, toasted and finely ground
90g (½ cup) instant polenta or wholegrain corn flour
2 teaspoons gluten-free baking powder
3 eggs, at room temperature
165g (¾ cup) caster sugar
125ml (½ cup) light olive oil
1 lemon, rind finely shredded, juiced
extra raw unsalted pistachios, toasted and coarsely chopped, to decorate
dried rose petals (optional), to decorate
Lemon and rosewater icing
125g (1 cup) pure icing sugar
1 tablespoon (about) strained fresh lemon juice
1 teaspoon rosewater
gluten-free pink or rose food colouring, to tint
Method
- Preheat oven to 180°C (160°C fan-forced). Brush a 20cm springform cake tin with olive oil and line the base with non-stick baking paper.
- Place the almond meal, ground pistachios, polenta and baking powder in a medium bowl and use a whisk to stir to combine and remove any lumps. Set aside.
- Use an electric mixer with a whisk attachment to whisk the eggs and sugar on medium-high speed until thick and pale and a ribbon trail forms when the whisk is lifted. Whisk in the olive oil, 2 tablespoons of the lemon juice and the lemon rind.
- Add the dry ingredients to the egg mixture and use a spatula or large metal spoon to fold until evenly combined. Pour into the prepared cake tin and bake for 30 minutes or until a skewer inserted in the centre comes out clean. Stand the cake in the tin on a wire rack for 10 minutes before removing the sides of the tin. Set aside to cool completely.
- To make the lemon and rosewater icing, sift the icing sugar into a medium bowl. Gradually stir in the 1 tablespoon lemon juice and the rosewater until the mixture is smooth and has a thick coating consistency, adding a little more juice if needed. Cover with plastic wrap and set aside at room temperature until ready to use.
- Drizzle the cooled cake with the icing and then sprinkle with extra pistachio nuts and dried rose petals, if using. Set aside for 30 minutes or until the icing has set before serving in wedges.
Baker's Tips
- This cake will keep in an airtight container at room temperature for up to 4 days.
This recipe is from Anneka's SBS Food online column Bakeproof: Gluten-free baking. Click here for more Bakeproof columns and recipes.
Photography by Alan Benson.
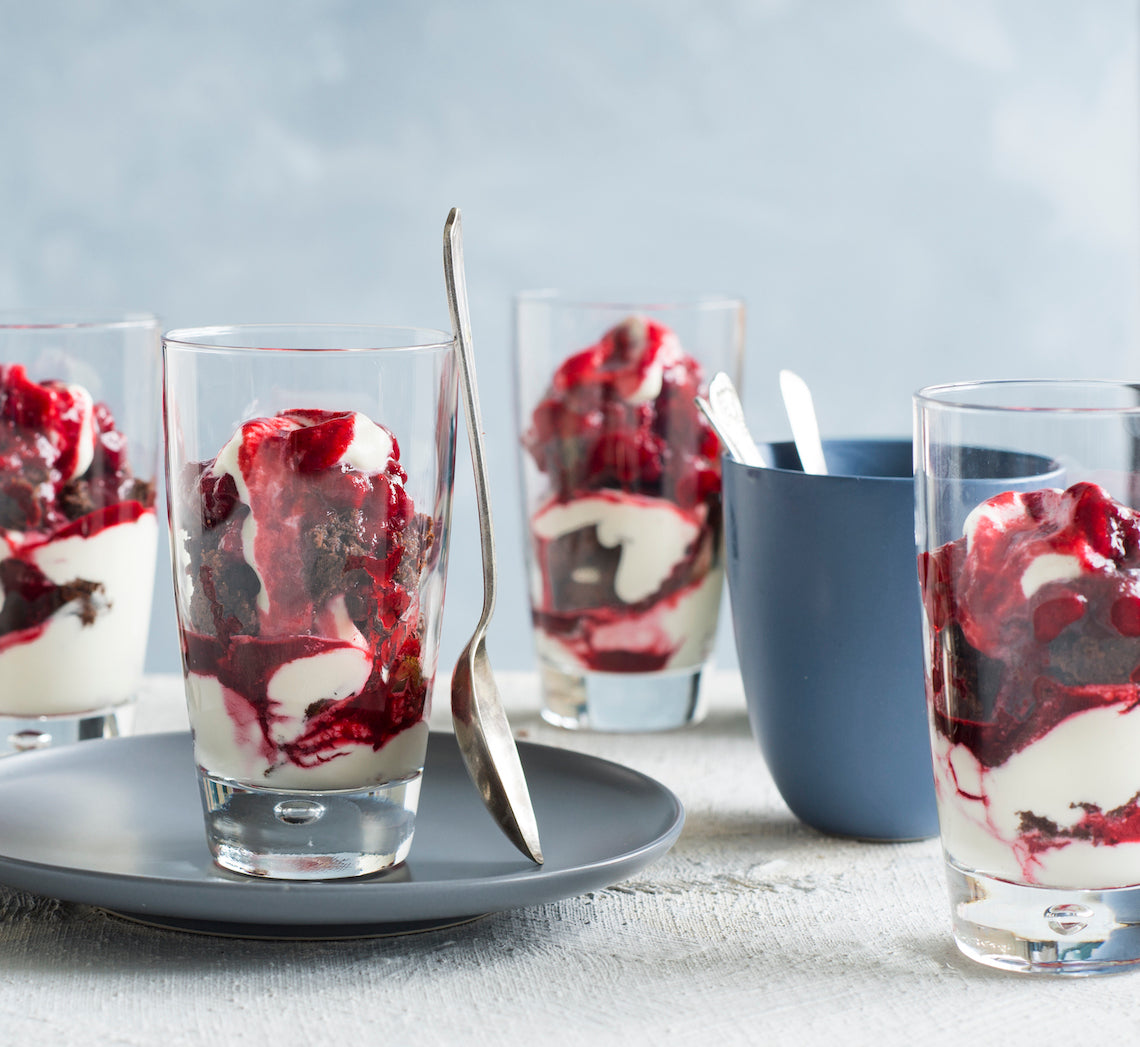
Prep 40min (+2hr cooling, 30min standing and 2hr chilling time)
Bake 45minMakes 10 serves
These trifles are a complete contradiction in terms when it comes to eating them – they are rich yet refreshing, sweet yet tart, indulgent yet light – and that’s what makes them so good.
Ingredients
Brownie cake
200g good-quality dark chocolate (45-54% cocoa solids), chopped
185g butter, cubed
220g (1 cup) caster sugar
3 eggs, at room temperature, lightly whisked
1 teaspoon natural vanilla extract or essence
185g (1¼ cups) plain flour
30g (¼ cup) Dutch cocoa powder
¾ teaspoon baking powder
Minted custard cream
375ml (1½ cups) milk
8 sprigs fresh mint
3 egg yolks
2 tablespoons caster sugar
1 teaspoon natural vanilla essence or extract
500ml (2 cups) thickened cream, whipped to soft peaks
Sweetened raspberries
600g frozen raspberries
55g (¼ cup) caster sugar
1½ tablespoons lemon juice
Method
- To make the Minted Custard Cream, put the milk and mint sprigs into a medium saucepan. Bring just to a simmer over a medium heat. Remove from heat and stand for 30 minutes to infuse. Remove the mint sprigs. Use a balloon whisk to whisk the egg yolks and sugar together in a heatproof bowl. Gradually whisk in the milk mixture until smooth and well combined. Return to the heat and stir constantly with the whisk over medium heat until the mixture thickens enough to coat the back of a spoon (do not simmer). Remove from the heat and stir in the vanilla. Pass the custard through a sieve into a heatproof bowl. Cover the surface with plastic wrap and refrigerate for 2 hours or until chilled.
- To make the Brownie Cake, preheat oven to 160°C (140°C fan-forced). Grease a 20cm springform tin with melted butter and line the base with piece of non-stick baking paper. Place the chocolate and butter in a medium heatproof bowl over a saucepan of simmering water (don’t let the base of the bowl touch the water). Stir occasionally until chocolate and butter melt and the mixture is smooth. Remove bowl from saucepan and set aside to cool slightly. Use an electric mixer with a whisk attachment to whisk the sugar, eggs and vanilla until thick and pale and a ribbon trail forms when the whisk is lifted. Whisk in the melted chocolate mixture. Sift together the flour, cocoa and baking powder, add to the egg mixture and use a large metal spoon or spatula to fold in until just combined.
- Pour mixture into the prepared tin and spread evenly. Bake for 40-45 minutes or until moist crumbs cling to a skewer inserted in the centre. Remove from the oven and cool in tin on a wire rack (this will take about 2 hours). Use a large serrated knife to cut the cake in half horizontally and then break it into chunks.
- To make the Sweetened Raspberries, combine the frozen raspberries, sugar and lemon juice in a medium saucepan. Cover and cook over medium heat, stirring occasionally until the raspberries have just thawed. Remove from heat and set aside to cool.
- To finish the Minted Custard Cream, fold the whipped cream through the chilled custard.
- To assemble, layer the Custard Cream, Brownie Cake chunks, and Sweetened Raspberries and their juice in individual glasses.
Baker's Tips
- The Brownie Cake will keep in an airtight continer at room temperature for up to 4 days. The Minted Custard Cream and Sweetned Raspberries will keep in separate airtight containers in the fridge for up to 2 days.
- You can also layer this trifle on one large serving dish and serve in scoops.
Photography by Alan Benson.
This recipe is from Anneka's SBS Food online column, Bakeproof: Brownies.
CLICK HERE for more Bakeproof columns and recipes.
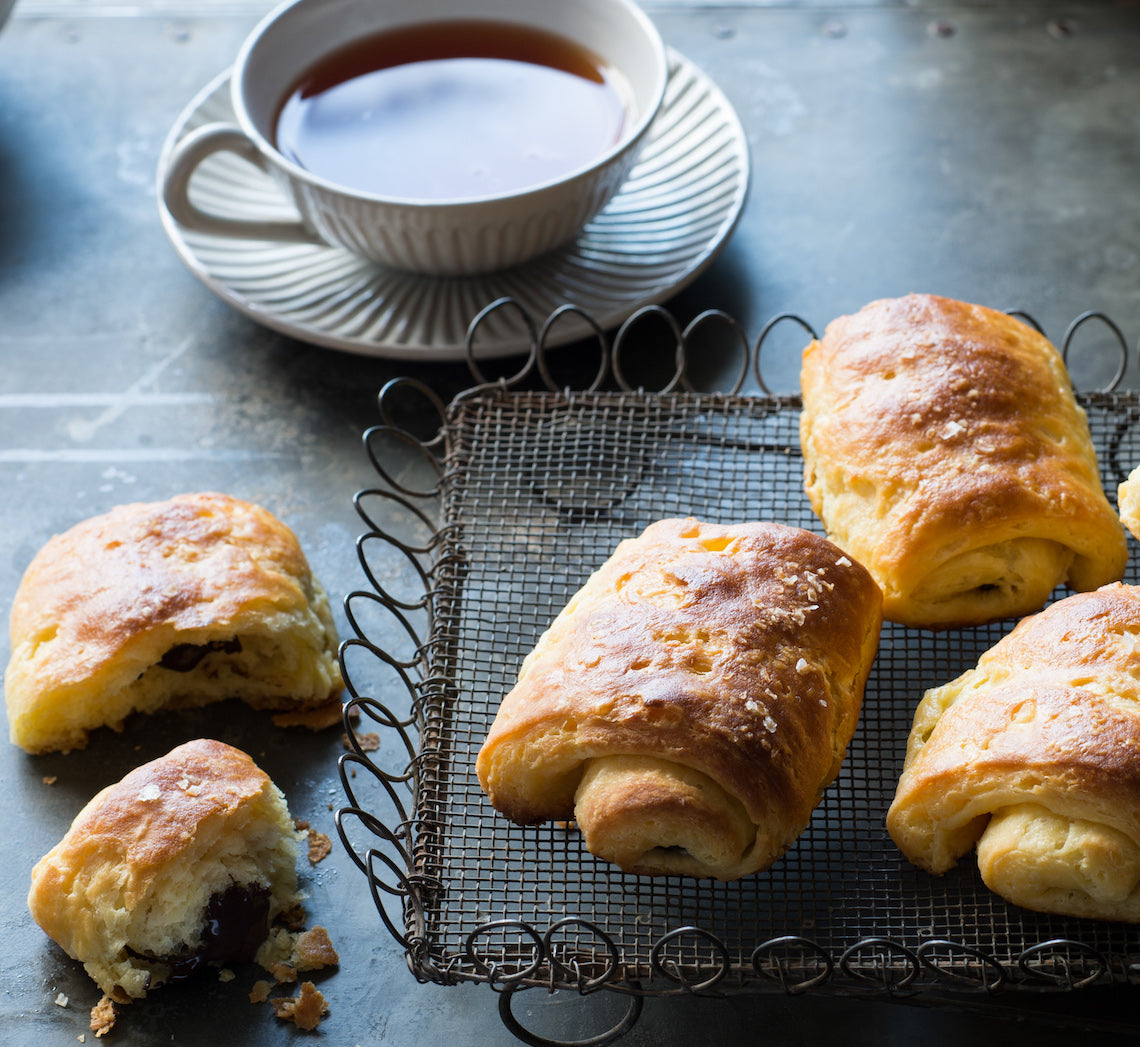
Prep 40min (+ overnight proving and 30min chilling time)Bake 25minMakes 8
At their best warm from the oven, these classic French pastries are based on the same pastry as a croissant, known as a leavened puff pastry (basically a puff pastry with yeast). These pain au chocolat uses a cheat’s pastry of sorts and gives a similar, less refined, result as the traditionally-made pastry, without the hassle of having to interleave the butter with the pastry dough as you fold it. The light sprinkling of sea salt flakes adds a surprising yet pleasant contrast to the sweetness of the chocolate centre.
Ingredients
125ml (½ cup/4fl oz) lukewarm milk
2 teaspoons (7g/¼oz 1 sachet) instant dried yeast
250g (1⅔ cups/9oz) bread flour (see Baker's Tips), plus extra to dust
185g (6½oz) chilled butter, cut into 2cm cubes
1 egg, at room temperature, lightly whisked,
2 tablespoons caster sugar
125g 4½oz) good-quality dark chocolate, chopped
1 extra egg, lightly whisked with 2 teaspoons milk, to glaze
Sea salt flakes (optional), to sprinkle
Icing sugar (optional), to dust
Method
- Put the milk in a medium bowl, sprinkle the yeast over the top and stir with a fork. Set aside for 5 minutes.
- Put the flour and butter into the bowl of a food processor and use the pulse button to process until the butter is cut into rough 1cm/½in pieces (make sure you don’t process any further). Transfer to a large bowl.
- Add the egg and sugar to the milk mixture and stir to combine. Add to the flour and butter mixture and use a wooden spoon and then your hands to mix until it is just combined and a soft dough forms. Cover the bowl with plastic wrap and place in the fridge overnight.
- Turn the dough onto a lightly floured surface and bring together with your hands. Knead briefly or until just smooth but the butter pieces are still visible. Shape into a rectangle and then use a lightly floured rolling pin to roll out until about 25cmx40cm/10inx16in, keeping the edges as straight as possible. With a long side nearest to you, fold the right third of the dough in to cover the centre third and then fold the left side in also. Turn the dough clockwise a quarter turn. Fold the dough into thirds as before to make a small rectangle.
- Flip the dough over on the bench so that the open edge is now underneath and repeat the rolling and folding process again as in step 4. You will finish with a small rectangle. Wrap well in plastic wrap and chill for 30 minutes.
- Preheat the oven to 190°C/375°F (170°C/340°F fan forced). Line a large baking tray with non-stick baking paper.
- Roll out the pastry with a lightly floured rolling pin on a lightly floured surface to a 30cm/12in square, about 5mm/¼in thick. Cut in half to make two 15cmx30cm/6inx12in rectangles, and then cut each into quarters so you end up with eight 7.5cmx15cm/3inx6in rectangles. Divide the chocolate evenly between the rectangles, placing it across the shorter end of each. Starting from the short end with the chocolate, roll the dough around the chocolate to form a roll. Place on the lined tray, seam-side down, and flatten slightly with the palm of your hand. Cover loosely with a slightly damp tea towel and set aside in a warm, draught-free place for 15 minutes or until the pastry has risen slightly and is ‘puffy’.
- Brush the pastries lightly with the egg and milk glaze and sprinkle with a little sea salt flakes, if desired. Bake in preheated oven for 25 minutes or until the pastry is golden, crisp and cooked through. Serve warm or at room temperature sprinkled with icing sugar, if desired.
CLICK HERE for more Bakeproof recipes.
Photography by Alan Benson.
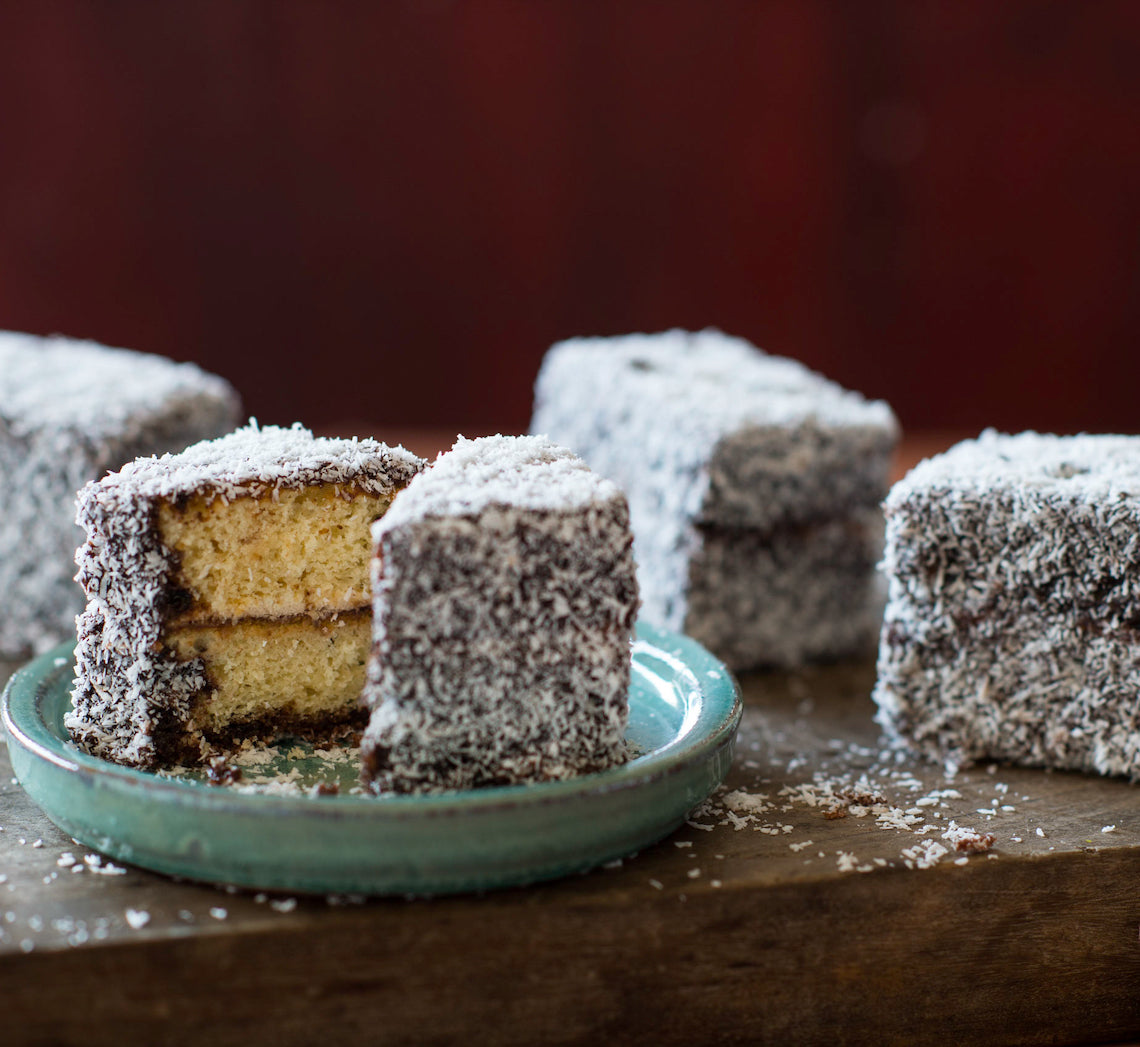
Prep 40min (+ 40min cooling and 20min chilling time)
Bake 20minMakes 9
Gluten-free cakes are sometimes hard to come by. Moist and flavoursome, these lamingtons won’t disappoint. Those with gluten or wheat intolerances and sensitivities won’t ever have to compromise if wanting to enjoy this Australian classic.
Ingredients
80ml (⅓ cup) thickened cream, whisked to firm peaks180g (2 cups) desiccated coconut, to coat
Gluten-free buttercake
175g (1¼ cups) purchased gluten-free plain flour mix2½ teaspoons gluten-free baking powder
165g (¾ cup) caster sugar
125g unsalted butter, cubed, softened
2 eggs, at room temperature
80ml (⅓ cup) milk
2 teaspoons natural vanilla extract or essence
Chocolate icing
465g (3¾ cups) pure icing sugar55g (½ cup) cocoa powder
150ml boiling water
1½ teaspoons vanilla essence
Method
- To make the gluten-free buttercake, preheat the oven to 180°C. Grease a 20 x 30cm (base measurement) shallow cake tin and line the base and two longs sides with one piece of baking paper.
- Put the flour, baking powder, sugar, butter, eggs, milk and vanilla in a large mixing bowl. Use an electric mixer to beat on low speed until combined. Increase the speed to medium and beat for 3 minutes or until the mixture is well combined and very pale in colour. Spoon the mixture into the lined tin and spread evenly using the back of a spoon. Lightly tap the tin on the bench 3 times to get rid of any excess air bubbles.
- Bake for 20 minutes or until cooked when tested with a skewer. Cool for 5 minutes in the tin, then turn onto a wire rack to cool completely (this will take about 40 minutes).
- To make the Chocolate Icing, sift the icing sugar and cocoa powder into a medium bowl. Add the boiling water and vanilla and stir until smooth (it should be the consistency of pouring cream).
- Trim the edges of the cooled cake and then cut in half to form two layers about 20 x 15cm. Spread one half of the cake with a little of the Chocolate Icing and then spread whipped cream. Top with the remaining cake half. Chill for 20 minutes or until the cream is firm enough to cut the cake.
- Use a sharp serrated knife to cut the layered cake into 9 portions (about 6.5 x 4.5cm each). Run a palette knife around the cut surface of each lamington to remove any excess cream.
- Spread the coconut on a tray or plate. Rest a cake portion on a fork, dip into the chocolate icing and then and spoon the icing over the top and sides to completely coat. Allow any extra icing to drip off. Roll the cake in the coconut to coat evenly. Place on a wire rack. Repeat with the remaining cake portions, icing and coconut.
Baker's Tips
- If the icing becomes too thick while you are coating the cake pieces, stir in enough extra boiling water, adding it a teaspoon at a time, to thin to the right consistency.
- These lamingtons will keep in an airtight container in the fridge for up to 2 days. Stand at room temperature for at least 30 minutes before serving.
This recipe is from Anneka's SBS Food online column Bakeproof: Lamingtons. CLICK HERE for more Bakeproof recipes.
Photography by Alan Benson.
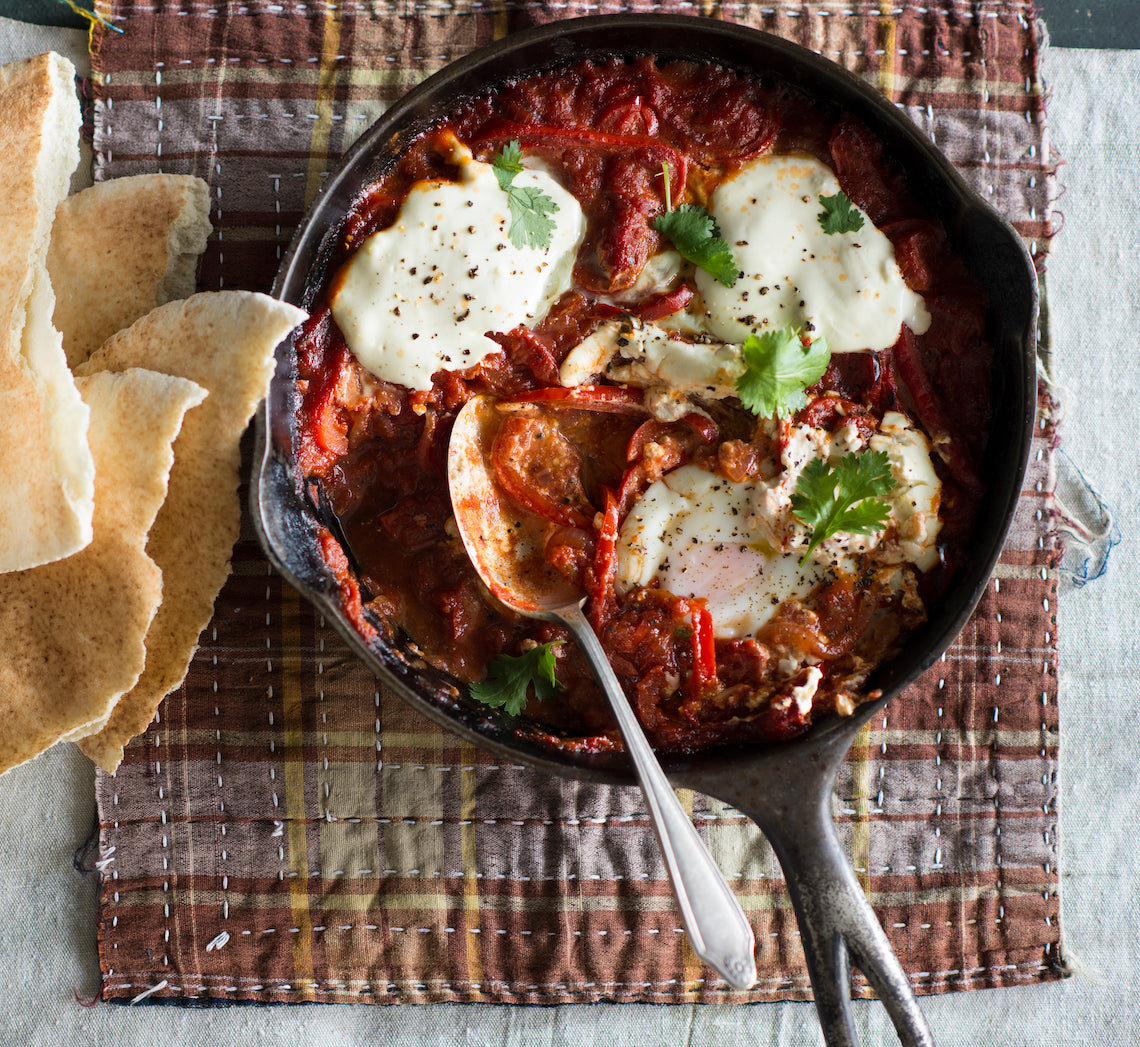
Prep 35minBake 12-18minMakes 6 serves
Nestled in an aromatic, slightly spicy tomato and capsicum sauce and topped with tangy yoghurt, these baked eggs, originally from Tunisia, make for a wonderful centre-of-the-table brunch dish. Serve with pita bread and let everyone help themselves.
Ingredients
1 tablespoon (20ml/¾fl oz) olive oil
2 red capsicum, deseeded, cut into thin strips
1 red onion, halved, sliced
1 teaspoon ground cumin
½ teaspoon dried chilli flakes
2 x 400g (14oz) cans diced tomatoes
Salt and freshly ground black pepper
6 x 60g (2oz) eggs, chilled
200g (7oz) Greek-style natural yoghurt
1 garlic clove, crushed
2 teaspoon fresh lemon juice
½ cup coriander leaves, to serve
Pita bread, to serve
Method
- Preheat oven to 220ºC/425°F (200ºC/400°F fan-forced). Heat the oil in a medium frying pan or saucepan and cook the capsicum and onion over medium heat for 15 minutes, stirring occasionally, or until tender. Add the cumin and chilli flakes and cook for a further 1 minute or until aromatic. Add the tomatoes, bring to a simmer and cook for 10 minutes or until reduced to a good sauce consistency. Season with salt and pepper.
- Spread the sauce over the base of a shallow 1.5 litre capacity (6 cup/2pt 10fl oz) ovenproof dish. Use the back of a spoon to make 6 indents in the sauce. Crack the eggs, one at a time, into a small dish and then gently slide into the indents, taking care not to break the yolks. Combine the yoghurt, garlic and lemon juice and spoon half of this mixture around the eggs, in about 6 spoonfuls. Reserve the remaining yoghurt mixture for serving.
- Bake for 12-18 minutes (see Baker's Tips) or until the eggs are just cooked but still soft in the centre. Serve immediately sprinkled with pepper and coriander, and accompanied by the reserved yoghurt mixture and pita bread.
Baker's Tips
- If using an ovenproof frying pan, you can make the sauce and then bake the eggs in the same pan.
- The baking time of the eggs will depend on the pan or dish you are using and the temperature of the sauce when you first added them.
- These baked eggs can also be baked in 6 individual 185 ml (¾ cup/6½fl oz) ovenproof dishes or ramekins. Divide the sauce between the dishes, make an indent in each and add an egg. Top with a spoonful of yoghurt and bake for 12-15 minutes or until the eggs are just cooked but still soft in the centre.
This recipe is from Anneka's SBS Food online column, Bakeproof: Autumn Brunch.
CLICK HERE for more Bakeproof recipes.
Photography by Alan Benson.
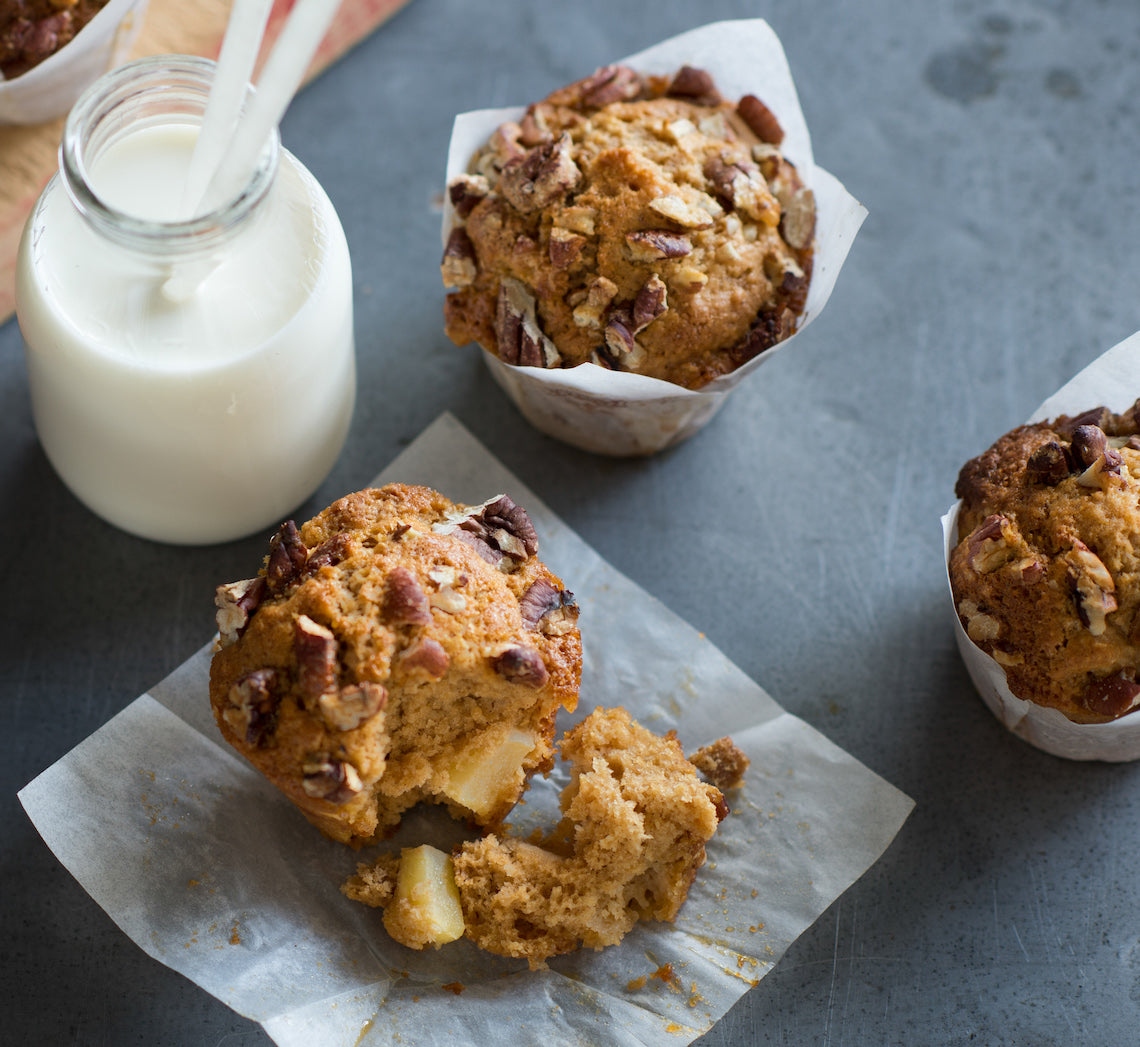
Prep 20min (+15min cooling time)Bake 25minMakes 12
I always say that muffins should have substance – they shouldn't have "cakey" character. After all, they're muffins, not cake! Dense with apple, sweet with spice and topped with pecans these muffins are one of my favourites.
Ingredients
150g plain flour
150g wholemeal plain flour
1 tablespoon baking powder
2 teaspoon ground cinnamon
150g (¾ cup, firmly packed) brown sugar
2 (about 180g each) apples (such as Golden Delicious, Pink Lady or Royal Gala), peeled and cut into 1.5 cm pieces
185ml (¾ cup) buttermilk (see Baker's Tips)
80ml (⅓ cup) light olive oil (see Baker's Tips)
2 eggs, at room temperature
1½ teaspoon natural vanilla essence or extract
75g (¾ cup) pecans, coarsely chopped
60ml (¼ cup) pure maple syrup
Method
- Preheat the oven to 190°C. Line 12 x 80ml (⅓ cup) muffin tray holes with muffin paper cases.
- Sift together both the flours, the baking powder and cinnamon into a large mixing bowl, returning any husks to the bowl. Stir in the sugar and apple and make a well in the centre.
- Use a fork to whisk together the buttermilk, oil, eggs and vanilla in a bowl. Add to the flour mixture and use a spatula or large metal spoon to fold together until just combined. (Don’t overmix – the batter should still be a little lumpy.)
- Spoon the mixture into the paper cases, dividing evenly. Sprinkle with the pecans and then drizzle with the maple syrup.
- Bake in preheated oven for 25 minutes or until the muffins are golden and cooked when tested with a skewer. Cool for a few minutes in the tin before transferring to a wire rack. Serve warm or at room temperature.
Baker's Tips
- If you don't have any buttermilk in the fridge, replace it with 160ml (⅔ cup) full-cream milk mixed with 2 teaspoons lemon juice.
- You can replace the light olive oil with sunflower or safflower oil.
- These muffins are best eaten the day they are baked, however they freeze well – wrap individually in plastic wrap and then seal in a plastic bag or airtight container. Freeze for up to 3 months. Thaw at room temperature.
This recipe is from Anneka's SBS Food online column, Bakeproof: Apples. CLICK HERE for more Bakeproof recipes.
Photography by Alan Benson.


